
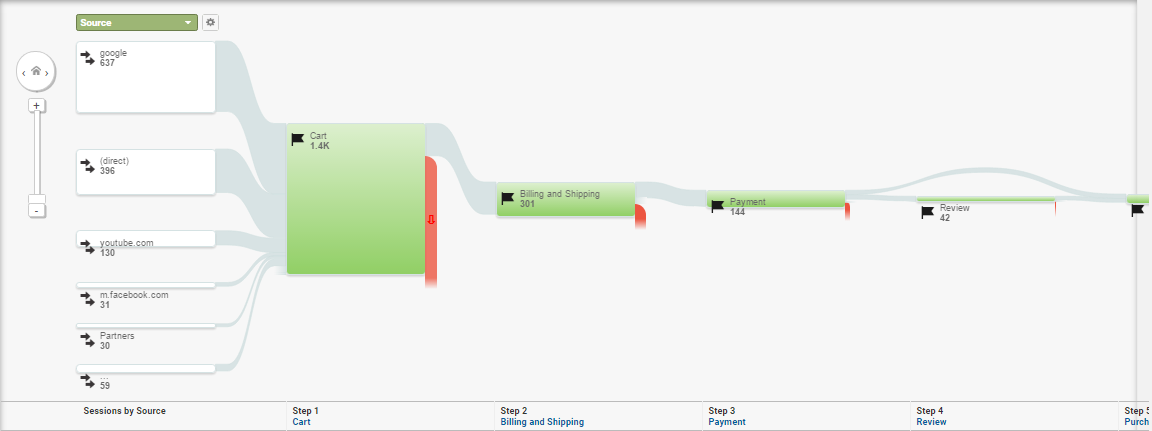
Google Analytics has become an indispensable tool to track all the activity is occurring in a website and to have a better understanding about how the customers are interacting since they landed in the website until a product is purchased from there (or not).
Then, what is the aim of integrating Marketing Cloud with Google Analytics (GA360)? Imagine we send an email with different promotions and, after a while, we see 100 customers did a purchase on the website. How do we know if those 100 people were part of the email audience and, if yes, if they landed on the website from the email we sent?
Before going into detail, like it is done with any type of campaign, it is important to define the purpose of the campaign, the way we will track the goals (the KPIs) and the UTM parameters will have to be defined based on that. Some of them could be standard for all the campaigns but sometimes we may need to create particular ones for specific campaigns.
We can analyze the performance of the email (open, clicks, bounces, unsubscribes…) to have an overview of the level of engagement the email has generated. But this is just the first step of the funnel. Now, we need to understand what happens with these customers on the website… time to talk about UTM parameters… let’s do magic!
UTM parameters are five tags you can add to the end of the URLs of your marketing or promotional efforts. When your appended URL is then visited, it allows analytics software to track information, such as how visitors are coming to your site and if they’re interacting with any content associated with a campaign.
HubSpot https://blog.hubspot.com/customers/understanding-basics-utm-parameters
How does the integration work?
The integration is really straight forward but, before listing the steps, let’s review a couple of points to be considered:
- Google Analytics 360 has to be purchased.
- Journey Builder has to be part of your license in Marketing Cloud.
- All the emails, whose links have to be tracked, must be sent from Journey Builder.
- GA360 will still remain as the analytics source of truth, from where to build the audience, views and manage the UTM parameters values (URL tags). It is not possible to change it from Marketing Cloud.
Once we are ready, we can proceed with the integration. All the steps are very detailed in the documentation, but the main ones are listed below (most of the configuration is directly managed in Marketing Cloud):
- Link GA360 and Marketing Cloud accounts (done by the admin user in both platforms).
- Select the GA360 properties and views from Marketing Cloud for each Business Unit (we can modify the data access to this integration for each one).
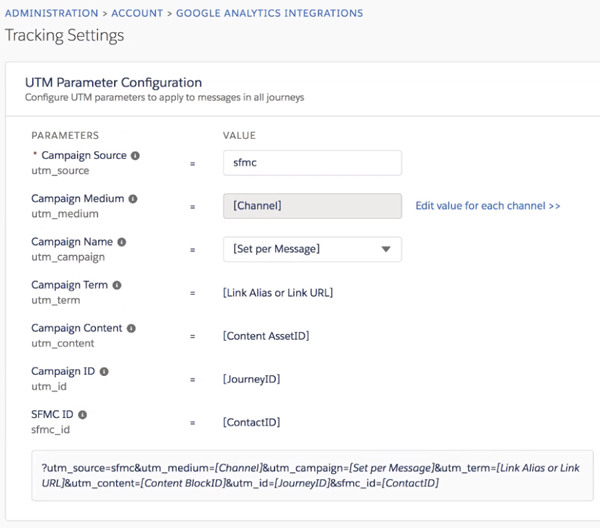
- Set up the UTM parameters that will be automatically appended to the URL of the email. Only the UTMSs ‘utm_source’, ‘utm_medium’ and ‘utm_campaign’ are configurable.
- Extra UTM parameters (if needed) have to be added manually directly in the links in the HTML of the email. Explained at the end of this post.
- Configure the GA360 permissions for the users you select (this activity requires admin role permissions).
Preparing Journey Builder
Once we completed the previous steps, we can easily test the integration importing an audience from GA360 to Marketing Cloud (the audiences are sync every 24 hours so we may have to wait until it appears as available).
In journey builder, we just need to select the Google Analytics entry source and set it up selecting the created audience.

Once the audience is selected, we can proceed to build the journey as usual. For example, in the picture below, we can see a journey where the audience coming from Google Analytics will receive an email and, after 3 days, it will create an Opportunity in Sales Cloud to the customers who clicked in a specific link of the email whereas a reminder SMS will be sent to the ones who didn’t click in any of them.

Before activating the journey, it is important to review the Journey Settings, making sure we have added the domain of the links has to be tracked in the email. So that, all the UTM parameters will be automatically appended to the URLs including that domain.

Preparing the email
Following with the previous example, the email has to be configured accordingly to include all the information needed at the URL tag level.
By default, as we saw at the beginning of this post, with the GA360 integration there is a default list of UTM parameters that will be automatically appended in the links of the email when sending it from Journey Builder. But, in case we need to add more UTMs, we need to do it manually in the HTML of the email, like in the example below.

As you can see, the UTMs are added right after the ‘?’ following the structure of utm_name and utm_value, where we can also use AMPScript to add extra personalization (e.g. %%status%%).
UTM structure summary
To sum up, the structure of a link generated automatically in journey builder by the time the email is sent will look like…
https://www.mydomain.com?utm_SFMCjobId=[Job_Id]&utm_SFMCsubsc_Id=[MC_Subscriber_Identifier]&utm_source=[utm_source]&utm_medium=[medium_Name]&utm_campaign=[template_Name]&utm_term=[alias]&utm_content=[content_Id]&utm_id=[sfmc_Identifier]&sfmc_id=[sfmc_Id]&sfmc_activityid=[sfmc_Activity_Id]
…and after adding the extra UTMs directly in the HTML of the email:
https://www.mydomain.com?utm_SFMCjobId=[Job_Id]&utm_SFMCsubsc_Id=[MC_Subscriber_Identifier]&utm_source=[utm_source]&utm_medium=[medium_Name]&utm_campaign=[template_Name]&utm_term=[alias]&utm_content=[content_Id]&utm_id=[sfmc_Identifier]&sfmc_id=[sfmc_Id]&sfmc_activityid=[sfmc_Activity_Id]&utm_customertype=[online]&utm_SFMCstatus=[%%status%%]
